User Manual
K3Y Overview


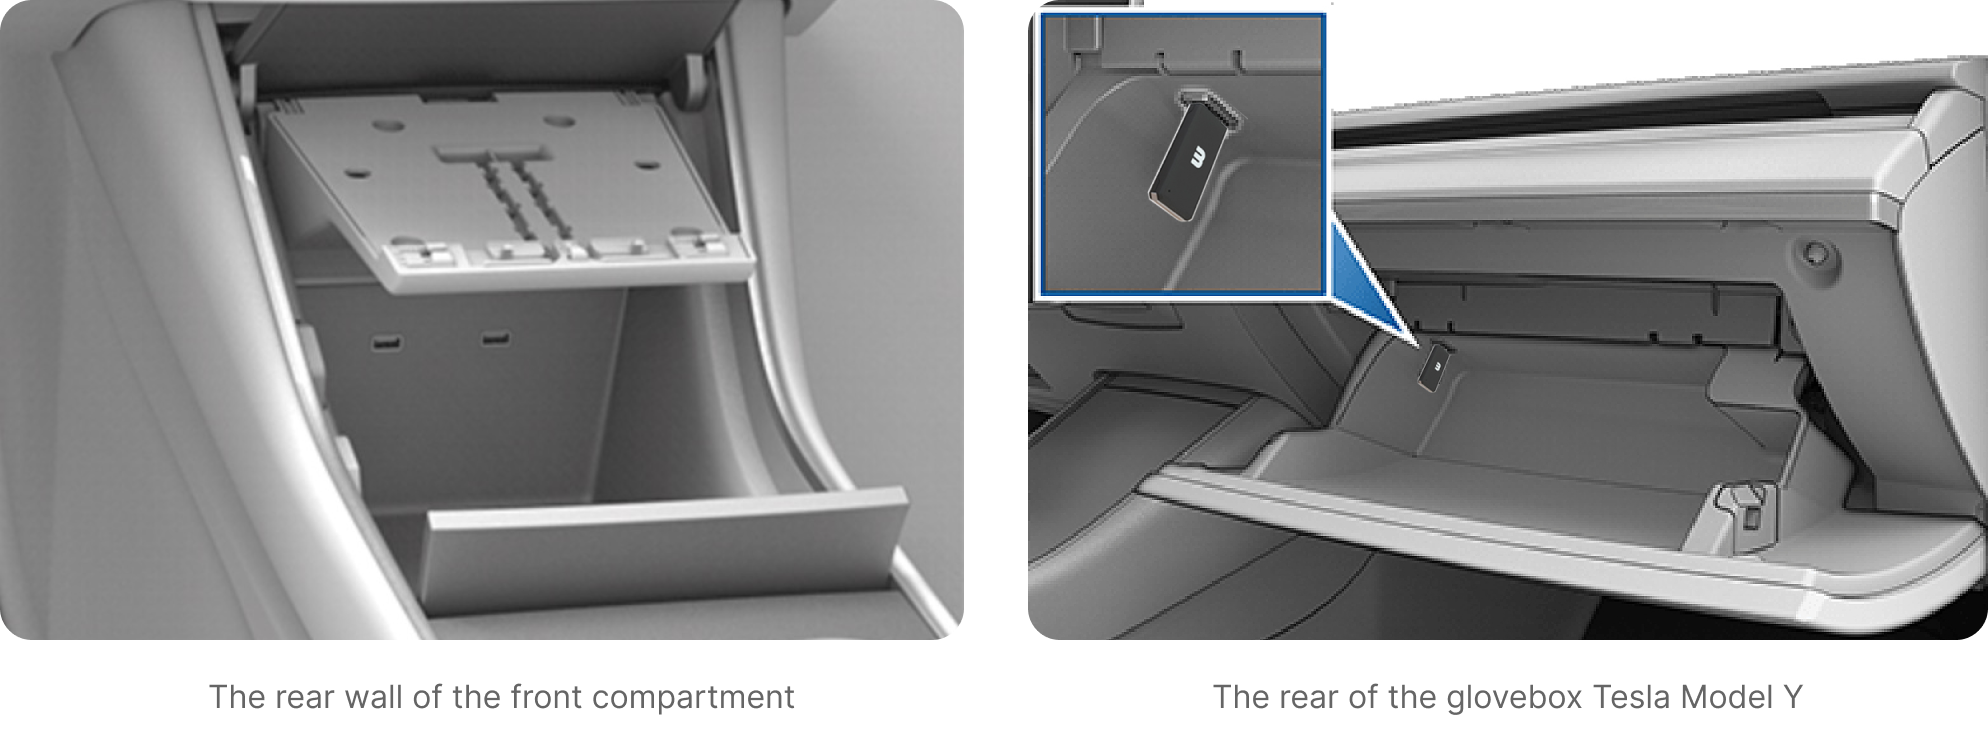
Connecting K3Y to Tesla
In 2020 and earlier models, plug K3Y into one of the center console USB ports (left picture below). In 2021 and later models, plug K3Y into the glovebox USB port (right picture below).
K3Y LED will indicate a solid blue light for ~30 seconds, followed by a flashing blue light for ~10 seconds and then a blinking yellow light meaning it’s ready for the setup process.
CONSOL3 Installation
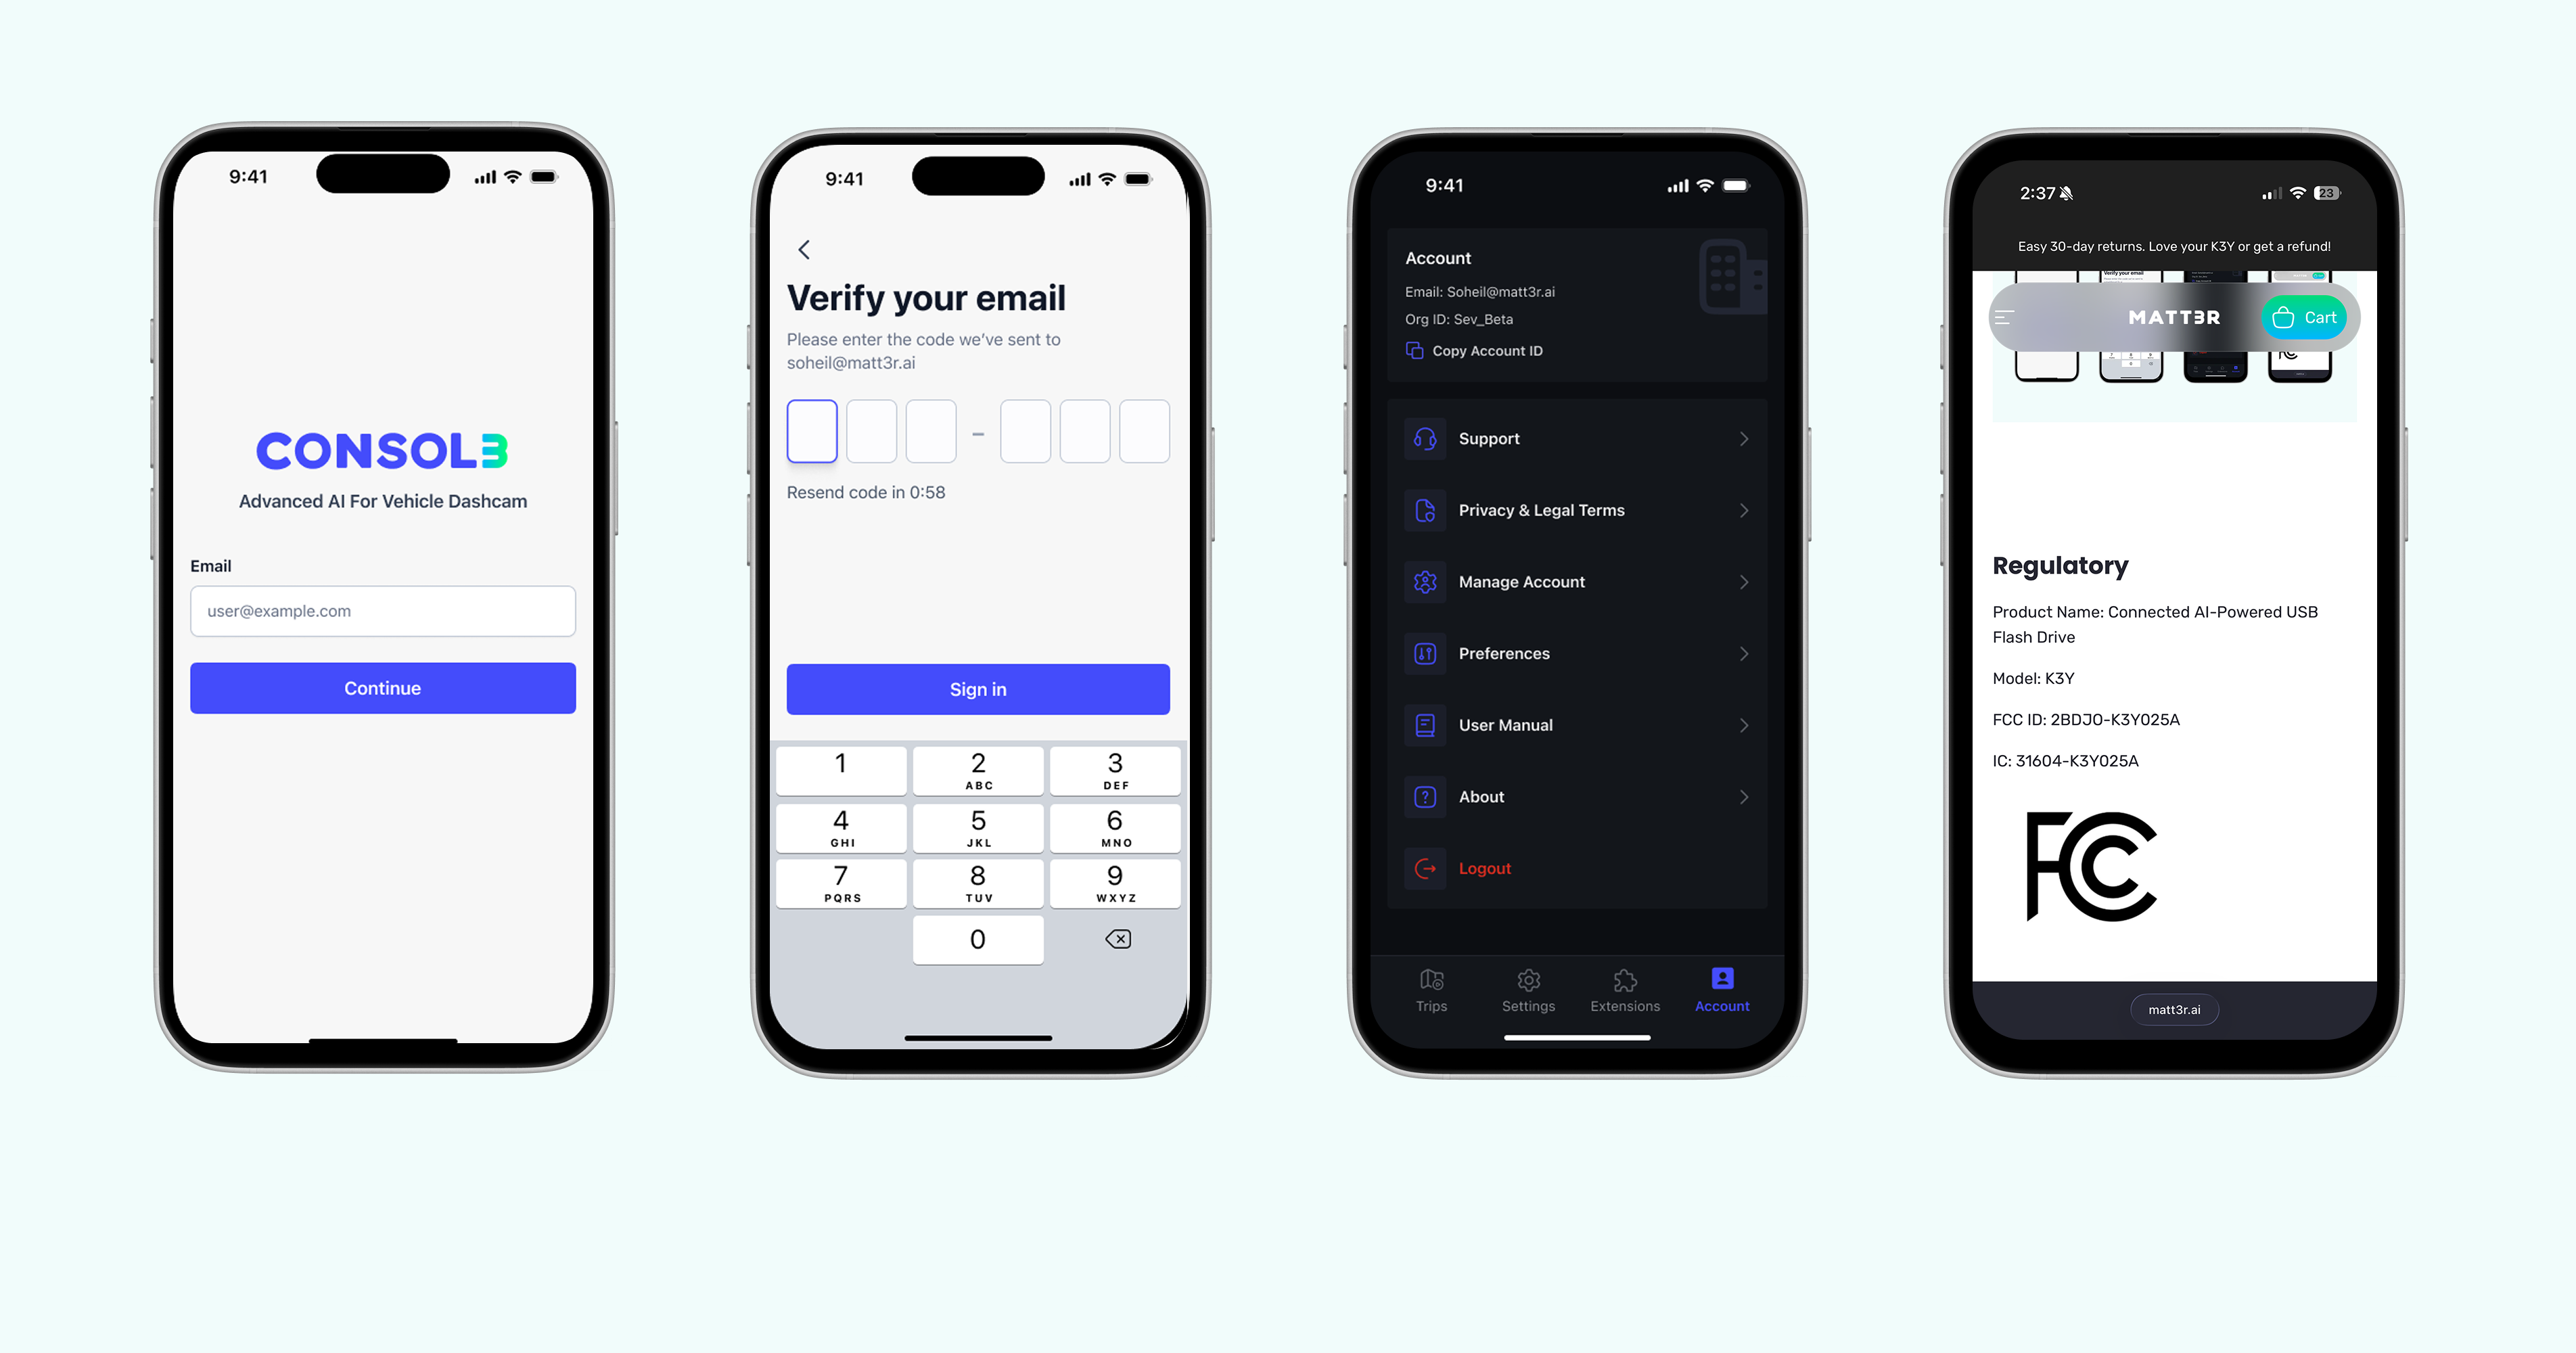
Get the CONSOL3 app directly from https://matt3r.ai/app or using the QR-Code below.

Log in to CONSOL3
To log in to Consol3, enter your Email Address and press continue. A confirmation code will be sent to your email. By submitting the confirmation code, you will be logged in to your account.

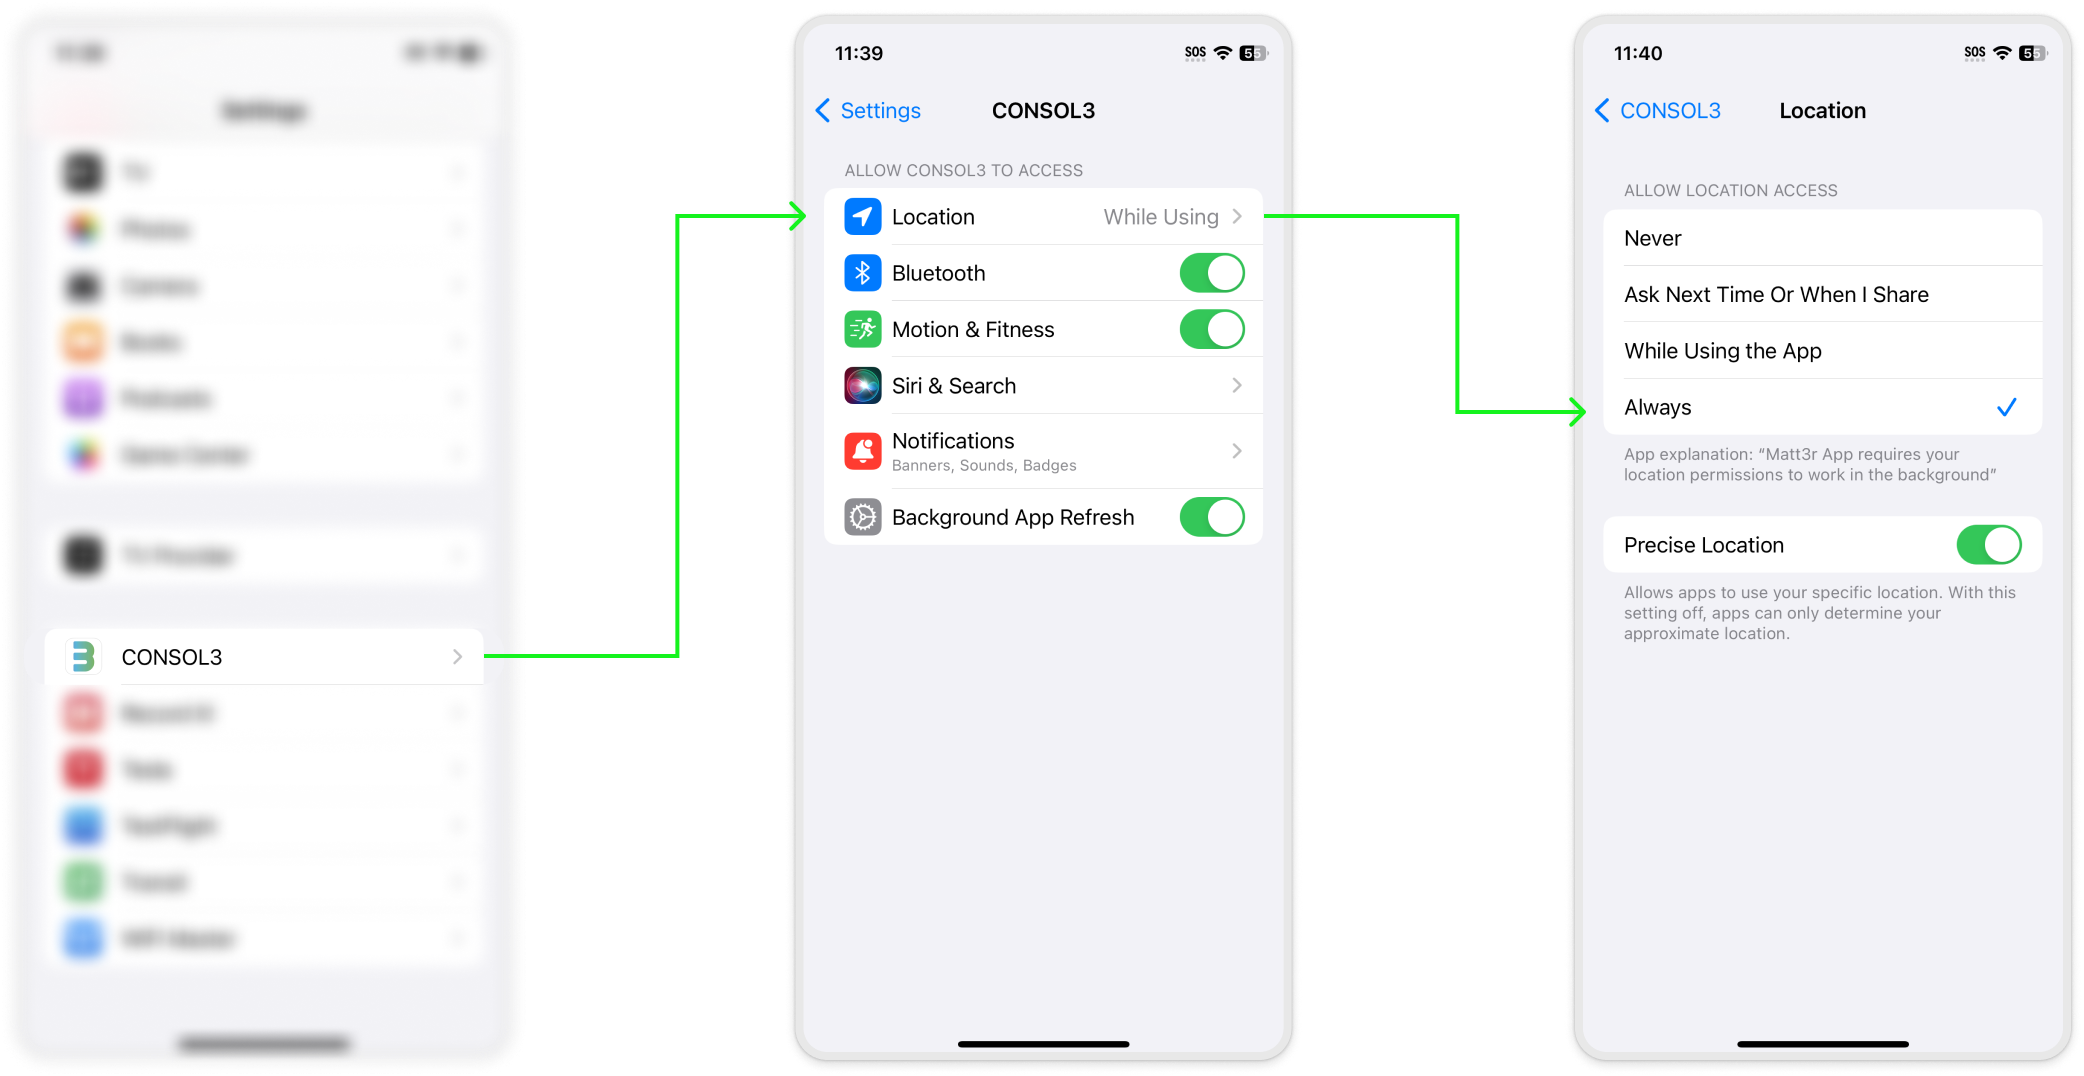
Permission Access
To ensure you have the best experience and that all activities are recorded accurately, please grant the necessary permissions.

Note:
When granting location access, please select the "Allow While Using App" option, then press on “While Using” button, and select “Change to Always Allow”. If you choose a different option, it may result in missing data, and you will be prompted for location permission each time you open CONSOL3. If you have previously chosen “Allow Once” you can change this setting by following the instructions in the accompanying image or by updating it in your phone's settings.
Add Tesla account
Go to the settings tab located in the app's bottom navigation, then tap on Link My Tesla.
A Tesla account is required to establish a secure connection between CONSOL3 and your Tesla vehicle. By connecting your Tesla account, MATT3R gets the necessary data from your Tesla vehicle, such as trips, vehicle speed and other relevant telemetry data. Please securely log in to your Tesla account and provide the necessary permissions. The CONSOL3 App does not record or store your Tesla credentials.


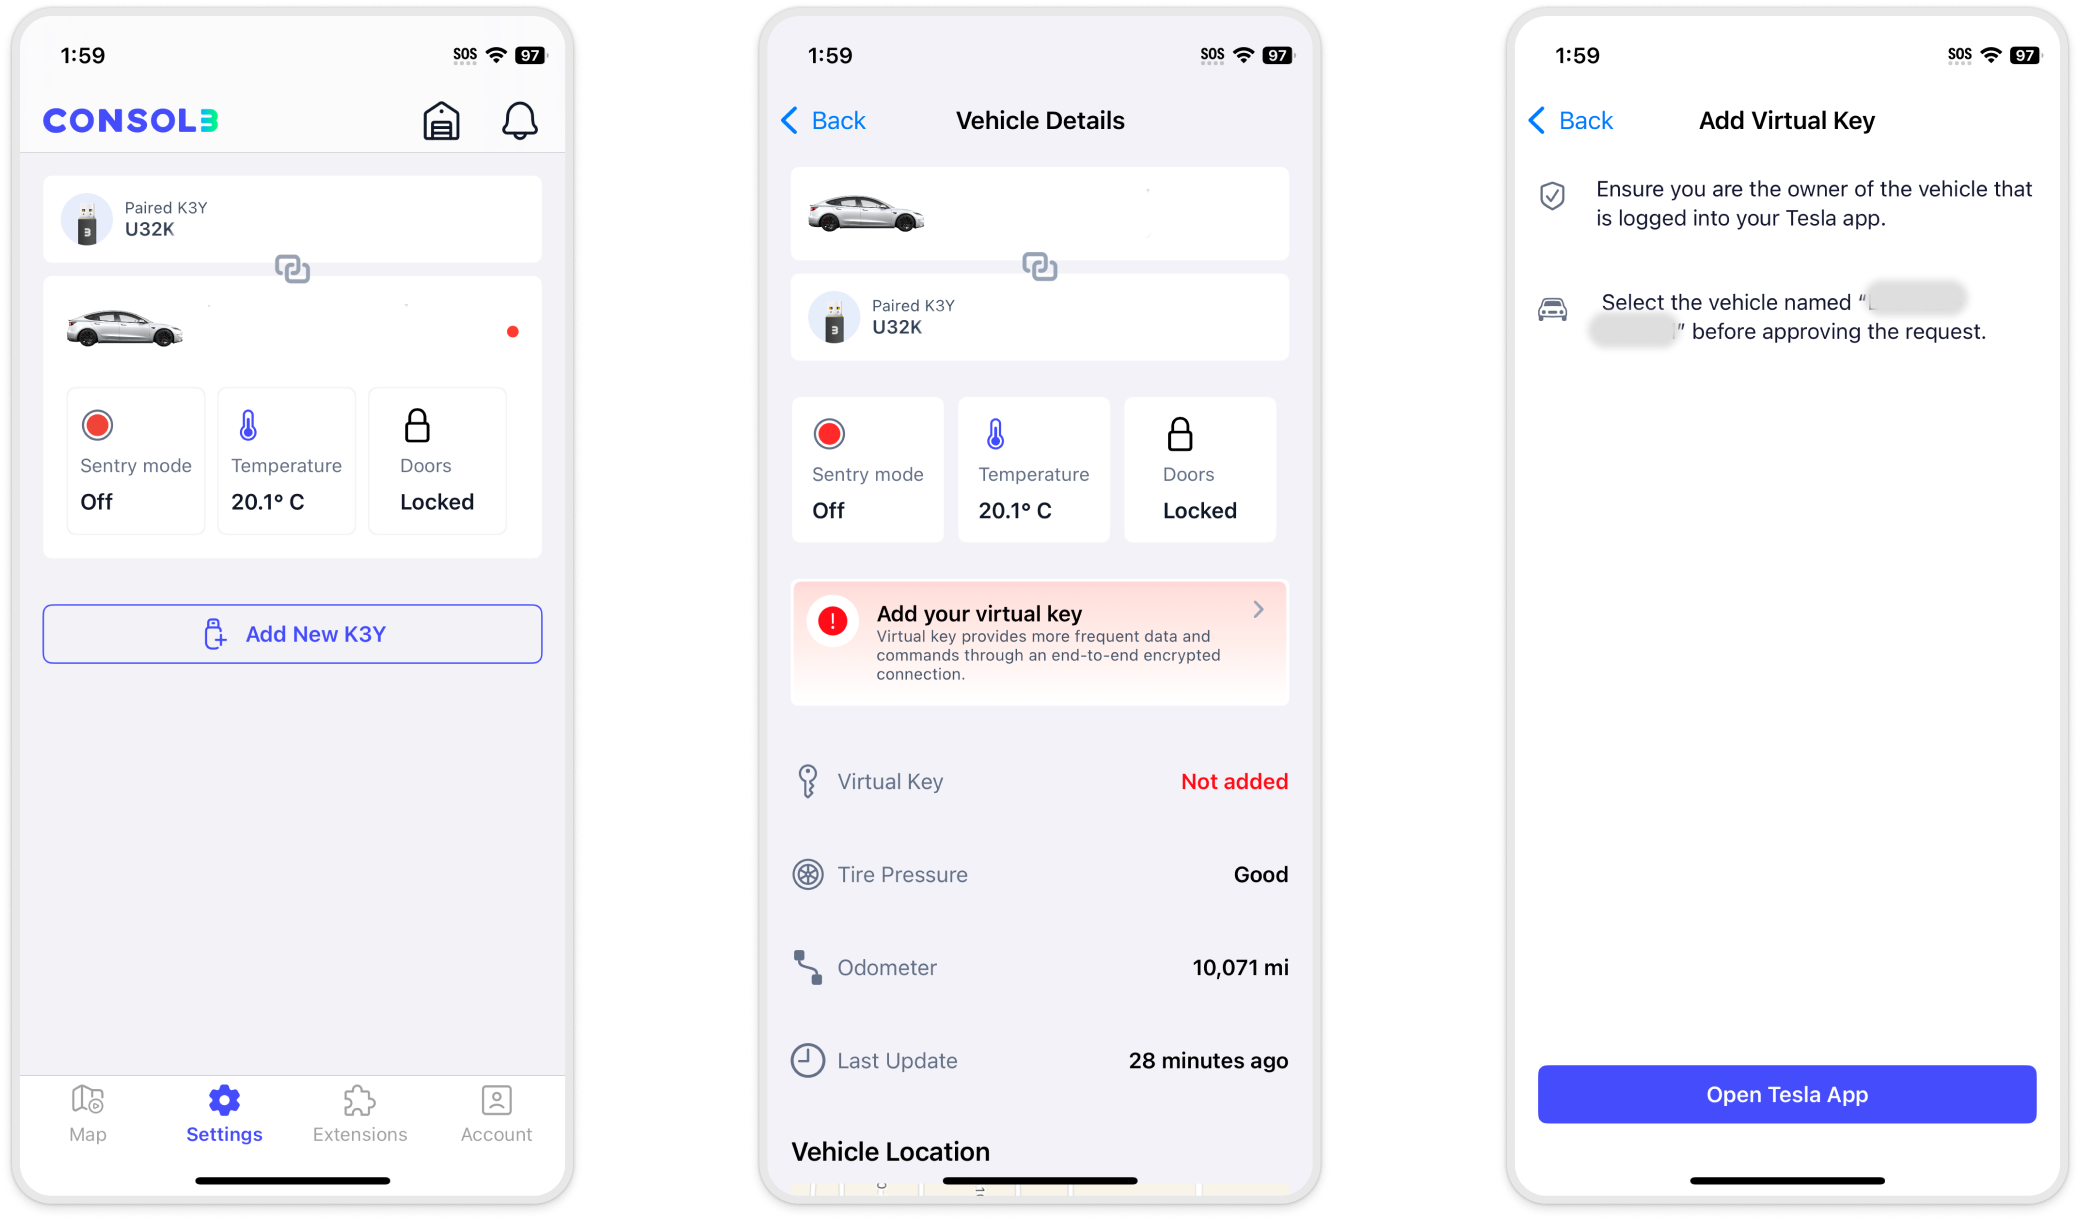
Adding the Virtual Key (Direct Telemetry Key) to Your Vehicle
1. Open the Consol3 App:
- Ensure you are logged into the app with your account.
2. Navigate to the Settings Tab:
- Tap on the Settings tab at the bottom of the app.
3. Select Your Vehicle:
- In the Vehicles section, locate the vehicle missing the virtual key (A red dot will appear on the top-right corner of the vehicle's card in case the direct telemetry key is missing on the vehicle).
- Tap on the vehicle card to open its details page.
4. Add the Virtual Key:
- Tap on "Add your virtual key" within the vehicle details page.
- Follow the on-screen instructions to link the key to your Tesla account.
5. Verify and Confirm:
- After adding the key, verify that the Virtual Key (Direct Telemetry Key) is active by checking the Vehicle Details
Telemetry typically begins transmitting within 2 minutes. The vehicle must be awake.
Setup
To connect K3Y to CONSOL3 via Bluetooth, follow these steps:
- Turn on Bluetooth on your phone, if not on already.
- In the CONSOL3 app, go to Settings > Setup My K3Y.
- Follow the instructions on CONSOL3 to navigate to the "Select Your K3Y page".
- Your K3Y shows up as a serial number (Uxxxxxxxx) in the list of Bluetooth devices.
- Once paired, K3Y Setup will start automatically.
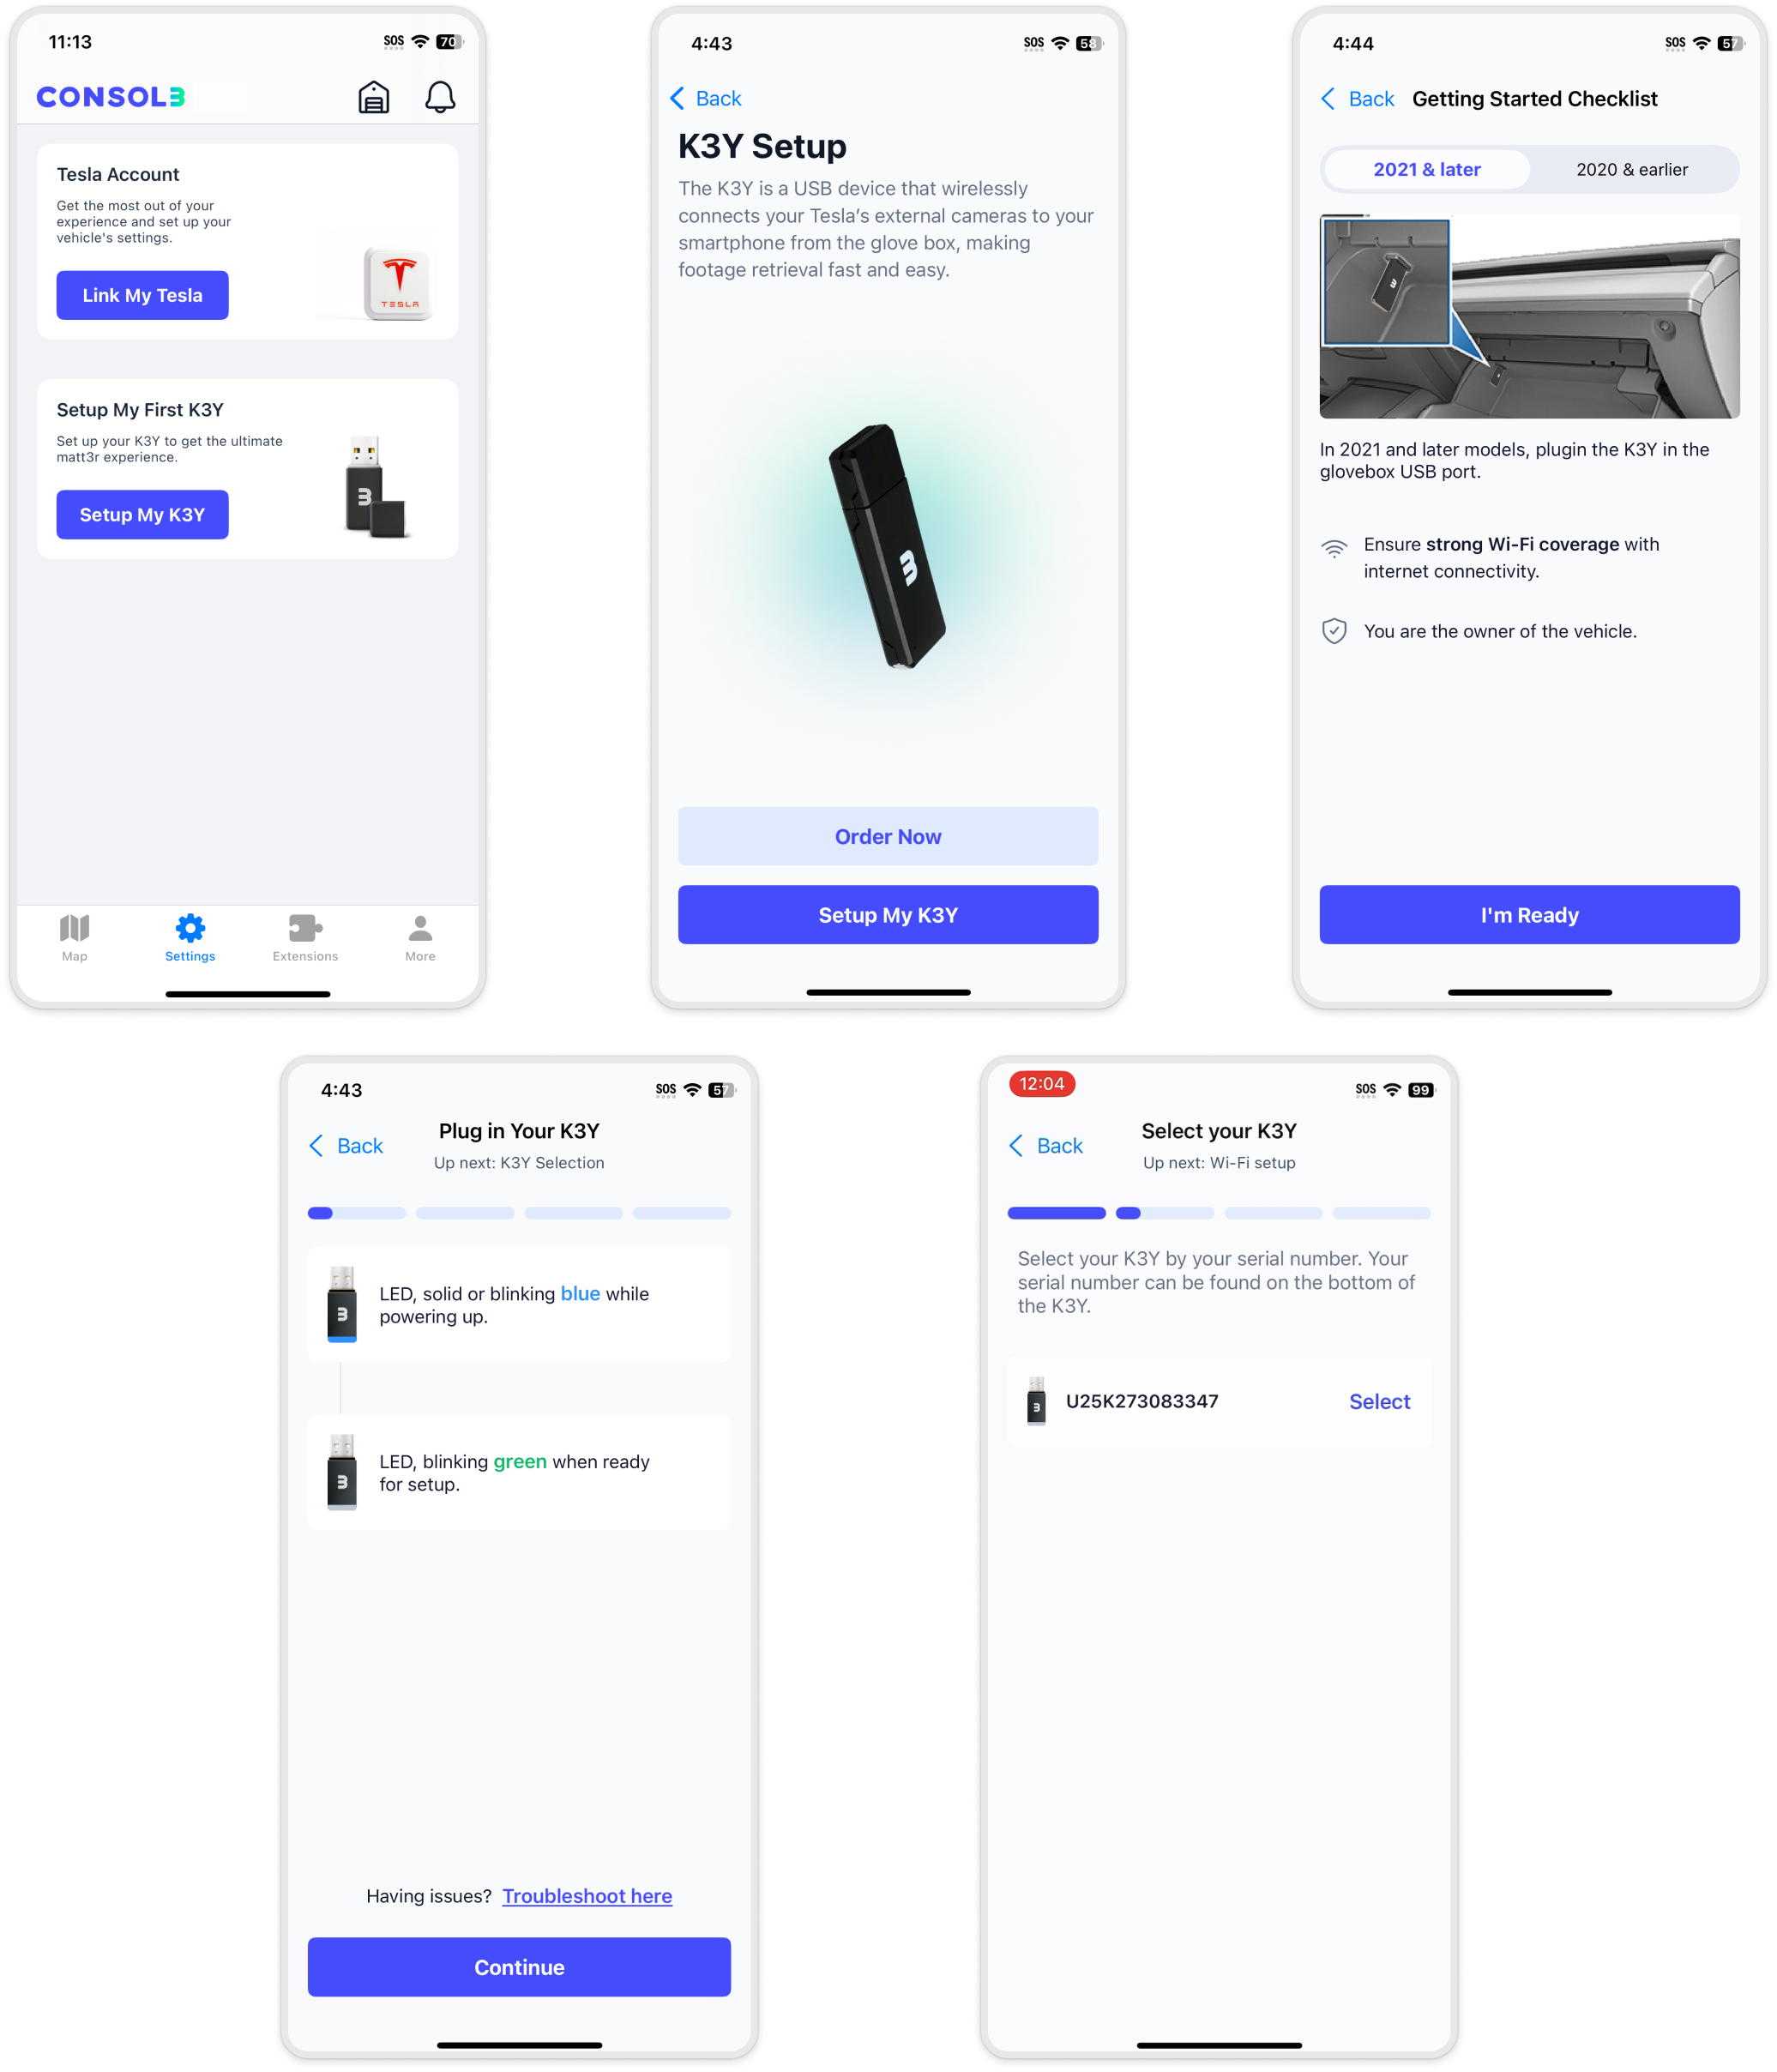
Wi-Fi Networks
Adding a Wi-Fi connection
To ensure that K3Y transmits data effectively, it's important to set up a Wi-Fi configuration. This enables K3Y to communicate with our servers securely to transmit data.
When setting up your K3Y, you will see a list of available WiFi networks after establishing a Bluetooth connection. Select your preferred network, enter the password, and your K3Y will be connected.
If your preferred SSID isn't listed, you can manually add it. You can also add, remove, or edit WiFi credentials in the settings at any time.

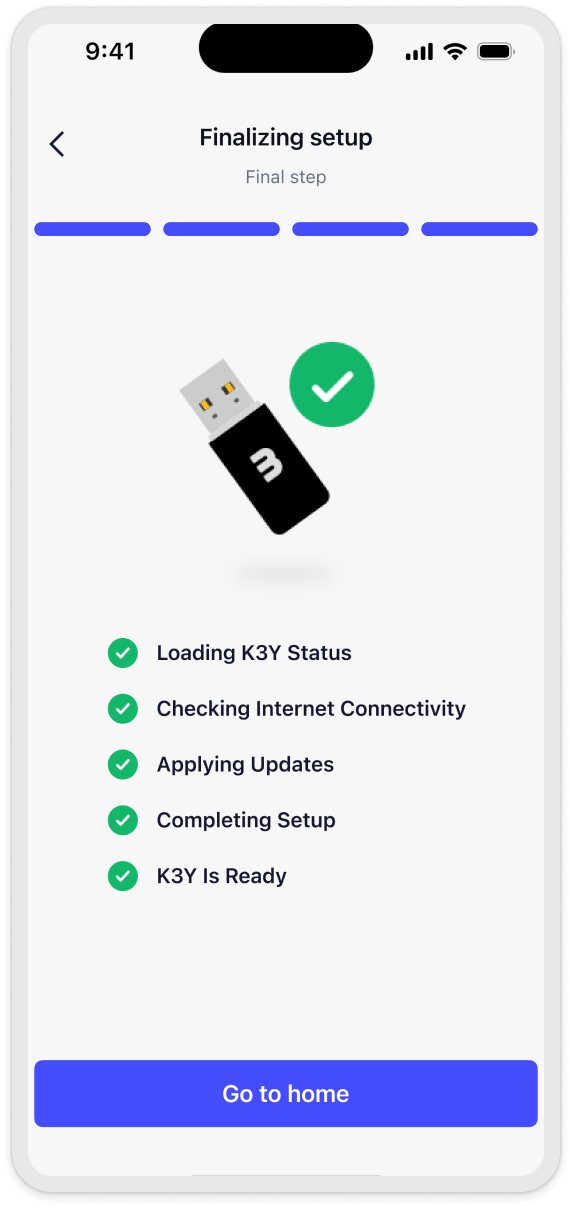
After adding the WiFi connection, your K3Y will begin downloading the necessary files. If everything goes smoothly, you should see this screen. Now, you can drive with your K3Y connected to your vehicle and view the recordings later.
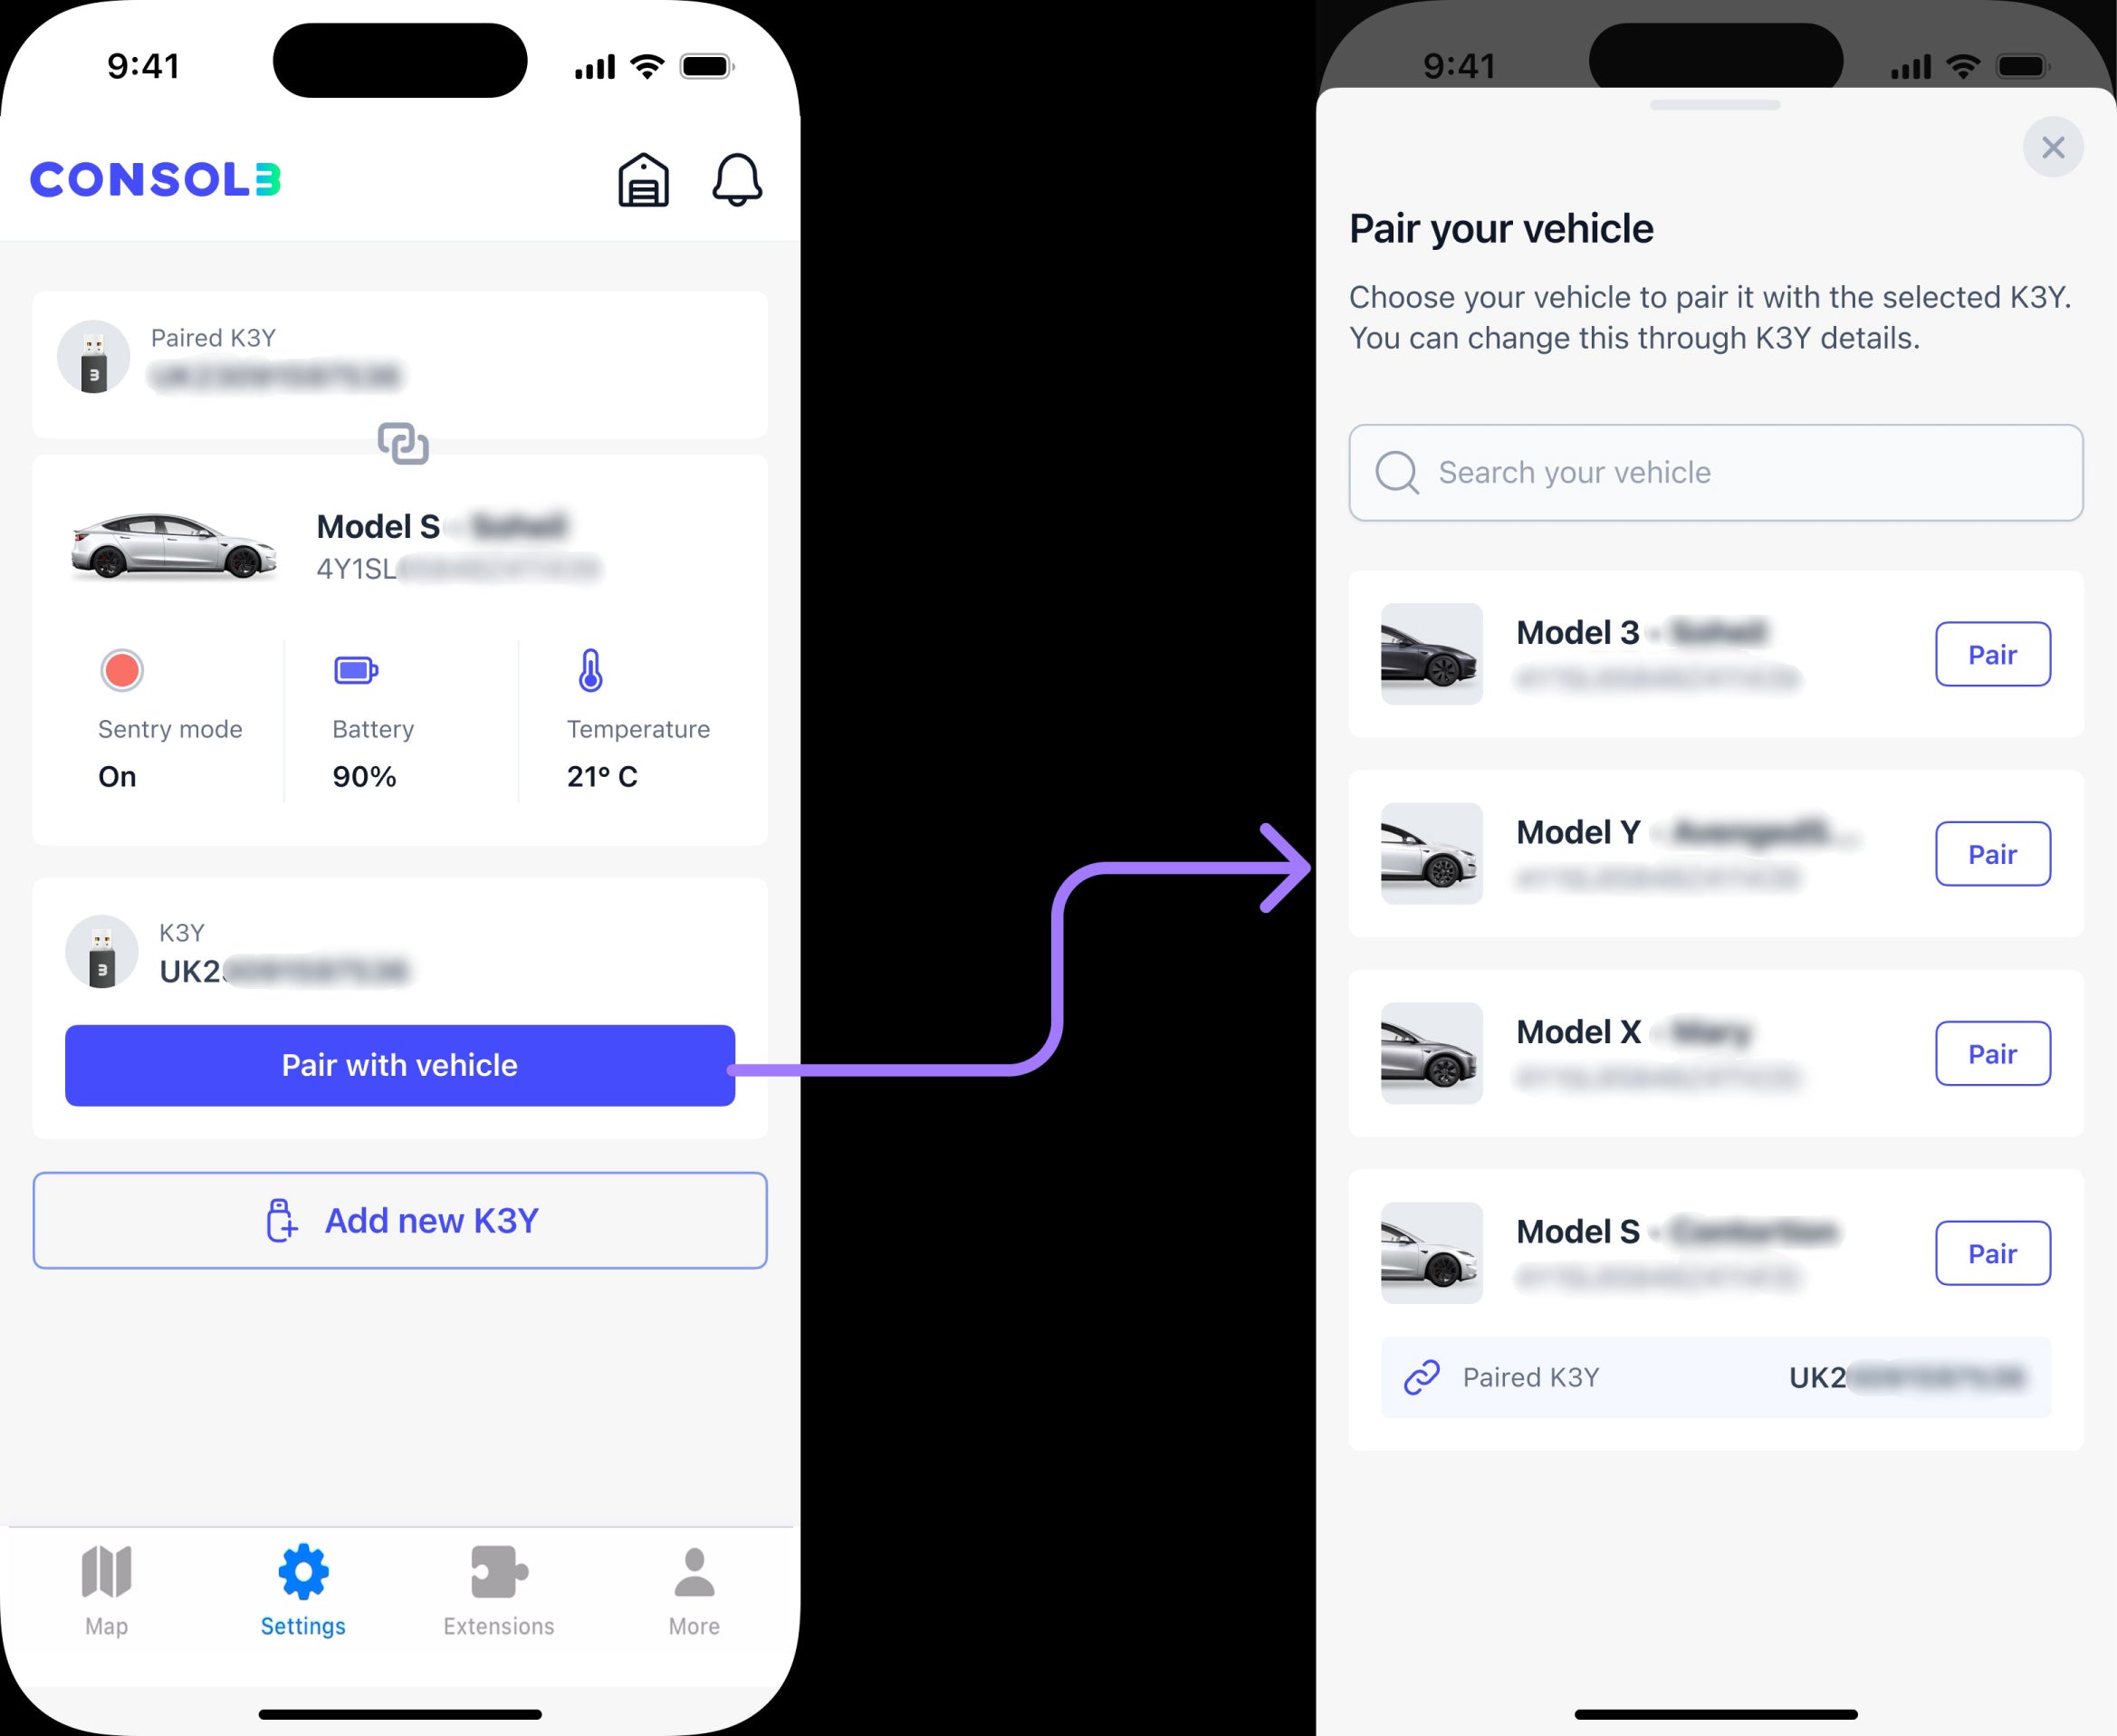
Pair K3Y and Vehicle
After logging into your Tesla account and setting up your K3Y, you need to pair the vehicle where the K3Y will be installed (or is already installed) with the device. To do this, navigate to the settings tab, tap on "Pair with Vehicle" under your K3Y, and select the car from the list that appears.
Clip Request (events)
If you have encountered a special incident and are curious about what happened, CONSOL3 makes it super easy to find out. Follow these steps:
- Find Your Trip: Locate your trip in the "Trips" list.
- Click on the Incident Icon: Tap the incident icon to start uploading the recording.
- Upload and Play: Once the upload is complete, you can play the clips from any of the external vehicle cameras.
Automatically Captured Incidents:
- Honks
- Harsh Brakes
- Front Collision Warning
- (FCW)Autopilot/FSD Disengagement


Clip Request (location based)
CONSOL3 allows you to effortlessly view recordings from your trip based on location with just a few taps. To retrieve a clip, follow these steps:
- Navigate to the Trip Section: Find your trip in the "Trip" section.
- Zoom In: Zoom in to the specific point where you want to view the recording, tap on it and hold your finger.
- Upload Recordings: Recordings will be uploaded when K3Y is near WiFi. Once uploaded, the icon turns blue, and you can play them.
Trips on CONSOL3
CONSOL3 retrieves your trips from two different sources:
Tesla Telemetry: When logged into your Tesla account with the Telemetry connection enabled, your car automatically sends trip data to CONSOL3.
CONSOL3 Trips: The CONSOL3 app captures trips in higher resolution than Tesla’s trip data. If your K3Y is connected to the car, your phone’s location services and Bluetooth are turned on, and the CONSOL3 app is running, CONSOL3 collects trip data automatically.
Sentry Clips
If Sentry Mode was enabled while your vehicle was parked, you can view the Sentry Clips on Consol3.
To do this:
1. Navigate to the Map tab. If the Sentry icon is enabled, a Sentry Clip is available for that trip.
2. Tap on the Sentry Clip icon to see the list of available clips.
3. Select the clip you want to view and request it.
4. Once your K3Y connects to WiFi, the clips will begin uploading.
5. When the upload is complete, the button changes to View.
6. Tap View to play the Sentry Clips from any vehicle angle.
Regulatory
Product Name: Connected AI-Powered USB Flash Drive
Model: K3Y
FCC ID: 2BDJO-K3Y025A
IC: 31604-K3Y025A

Federal Communication Commission Interference Statement
This device complies with Part 15 of the FCC Rules. Operation is subject to the following two conditions: (1) This device may not cause harmful interference, and (2) this device must accept any interference received, including interference that may cause undesired operation.
This equipment has been tested and found to comply with the limits for a Class B digital device, pursuant to Part 15 of the FCC Rules. These limits are designed to provide reasonable protection against harmful interference in a residential installation. This equipment generates, uses and can radiate radio frequency energy and, if not installed and used in accordance with the instructions, may cause harmful interference to radio communications. However, there is no guarantee that interference will not occur in a particular installation. If this equipment does cause harmful interference to radio or television reception, which can be determined by turning the equipment off and on, the user is encouraged to try to correct the interference by one of the following measures:
- Reorient or relocate the receiving antenna.
- Increase the separation between the equipment and receiver.
- Connect the equipment into an outlet on a circuit different from that to which the receiver is connected.
- Consult the dealer or an experienced radio/TV technician for help.
FCC Caution: Any changes or modifications not expressly approved by the party responsible for compliance could void the user's authority to operate this equipment.
This transmitter must not be co-located or operating in conjunction with any other antenna or transmitter.
This device meets all the other requirements specified in Part 15E, Section 15.407 of the FCC Rules.
Radiation Exposure Statement
The product complies with the FCC portable RF exposure limit set forth for an uncontrolled environment and is safe for intended operation as described in this manual.
To comply with RF exposure requirements, a minimum separation distance of 5 mm must be maintained between the user’s body including the antenna.
Industry Canada Statement
This device complies with ISED’s license-exempt RSSs. Operation is subject to the following two conditions: (1) This device may not cause harmful interference, and (2) this device must accept any interference received, including interference that may cause undesired operation.
Le présent appareil est conforme aux CNR d’ ISED applicables aux appareils radio exempts de licence. L’exploitation est autorisée aux deux conditions suivantes : (1) le dispositif ne doit pas produire de brouillage préjudiciable, et (2) ce dispositif doit accepter tout brouillage reçu, y compris un brouillage susceptible de provoquer un fonctionnement indésirable.
Caution :
(iv) where applicable, antenna type(s), antenna models(s), and worst-case tilt angle(s) necessary to remain compliant with the e.i.r.p. elevation mask requirement set forth in section 6.2.2.3 shall be clearly indicated.
Avertissement:
Le guide d’utilisation des dispositifs pour réseaux locaux doit inclure des instructions précises sur les restrictions susmentionnées, notamment : (iv) lorsqu’il y a lieu, les types d’antennes (s’il y en a plusieurs), les numéros de modèle de l’antenne et les pires angles d’inclinaison nécessaires pour rester conforme à l’exigence de la p.i.r.e. applicable au masque d’élévation, énoncée à la section 6.2.2.3, doivent être clairement indiqués
Radiation Exposure Statement
The product complies with the ISED portable RF exposure limit set forth for an uncontrolled environment and is safe for intended operation as described in this manual.
To comply with RF exposure requirements, a minimum separation distance of 5 mm must be maintained between the user’s body including the antenna.
Déclaration d'exposition aux radiations:
Le produit est conforme à la limite d'exposition RF portable de la ISED établie pour un environnement non contrôlé et est sans danger pour le fonctionnement prévu, comme décrit dans ce manuel.
Pour se conformer aux exigences d'exposition RF, une distance de séparation minimale de 5 mm doit être maintenue entre le corps de l'utilisateur, y compris l'antenne.
E-Label Information
The FCC/ISED regulatory information can be found in the companion mobile application Consol3 as described in Section “Mobile Application”.
Step 1 – Open the app and enter the username and password to login.
Step 2 – Navigate to the “Account” page and tap on the “User Manual”
Step 3 – Navigate to the “Regulatory” section, where applicable regulatory information is displayed.
Les informations réglementaires de la ISED se trouvent dans l'application mobile compagnon Consol3, tel que décrit dans la section "Application Mobile".
Étape 1 – Ouvrez l'application et saisissez le nom d'utilisateur et le mot de passe pour vous connecter.
Étape 2 – Accédez à la page « Compte » et appuyez sur « Manuel d’utilisation ».
Étape 3 – Rendez-vous dans la section "Réglementation", où les informations réglementaires applicables sont affichées.